Extend your LAN with WireGuard
I configured a WireGuard VPN server to handle remote access to my network aswell as a LAN-to-LAN bridge to remote servers

Featured image by Maria Teneva @ Unsplash https://unsplash.com/photos/tu06YSdoqUs
I have lots of internal services at my home. So I installed a classic host-to-LAN VPN server.
And I then realized that most of the work was done to implement a Virtual Private Network and to access it from my home network.
The goal
First of all, why would I ever do that? I mean, accessing my LAN from anywhere is quick&easy with the VPN server I already set up.
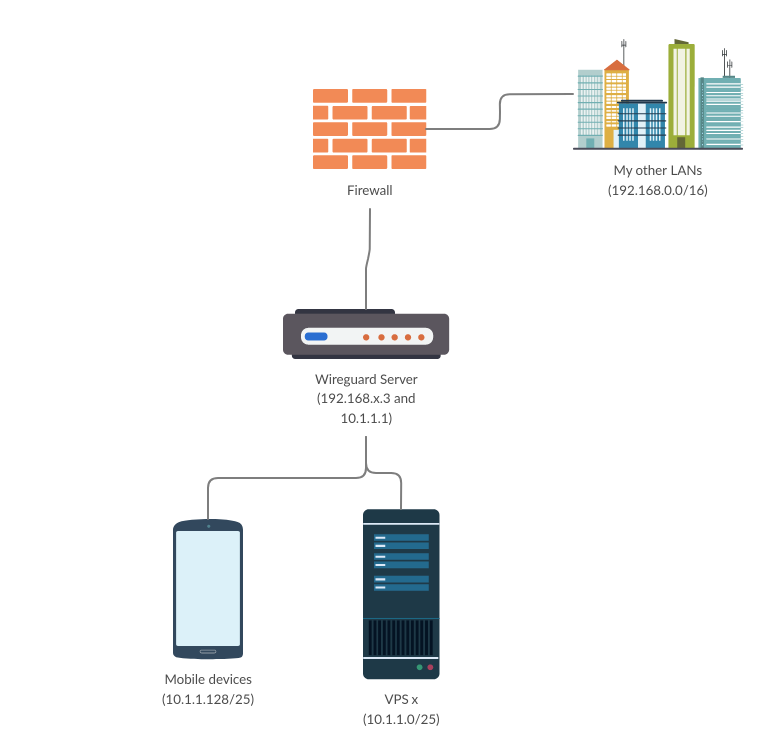
I don't only have a LAN. I have several LANs and remote VPS I use for personal purposes.
I wanted to have dedicated interfaces to manage them and avoid useless attack surface on the Internet.
Most of the tutorials out there to setup a VPN host-to-LAN service use NAT to masquerade the VPN clients on the LAN. I didn't want that. In fact, I though this would be more interesting to keep the IP addresses as is to allow VPN-specific filtering.
So I sat down and thought a bit about that. And I came with this architecture:
How to do it
First of all, I wanted something lightweight on my server but still reasonably isolated. So I installed a new VM with Alpine Linux. This is not difficult and is similar to the installation of most Linux distributions.
Then, to be able to install WireGuard from the package, you have to enable the community repo. This can be done by uncommenting the corresponding mirror in your /etc/apk/repositories configuration file.
If the line is not present, you have to append the address of your mirror. A mirror list can be found here.
The URL should be in the following format:
https://<mirror-server>/alpine/<version>/communityThen install WireGuard using:
apk add wireguard-toolsYour server will need a public and a private key to operate (as every peer of the WireGuard VPN).
The command to generate both the public and private key will store them in the privatekey and publickey files. I'd recommend you execute it in a folder owned by root having the proper file permissions to avoid the leakage of the private key.
You can use /etc/wireguard for this purpose:
cd /etc/wireguard
umask 077
# Then generate the keys
wg genkey | tee privatekey | wg pubkey > publickey
Once the keys are generated, copy the contents of the privatekey file. Create a wg0.conf file under the same directory and put the following contents:
[Interface]
Address = 10.1.1.1/24 # Here is the VPN network you want to use. The host part will be used for the server interface
ListenPort = 51820 # This is the usual port for WireGuard but nothing prevents you to change it
PrivateKey = # Paste here the contents of the privatekey file
Note: the guides I found usually use the PostUp and PostDown options to execute commands after the tunnel is turned Up or Down. But these are a bit limited. Moreover, Alpine doesn't ship with systemd so systemctl enable wg-quick@wg0 won't work. That's why I'm prefering a script. This may be executed by init.d or by cron at reboot.
Don't forget to activate IP forwarding in the Linux Kernel. Modify or add the following line in /etc/sysctl.conf:
net.ipv4.ip_forward = 1And to take the modification into account without a reboot:
sysctl -p /etc/sysctl.confYou're now ready to configure iptables. The simplest way in my opinion is to create a bash script automatically executed at reboot:
#!/bin/bash

# My physical interface is eth0

i=wg0 # Name your WireGuard interface here

# Overriding the PATH env variable just to make sure wg-quick is available
PATH=/sbin/:/usr/bin/:/bin:/usr/sbin

wg-quick up $i

# Allowing all active and related connections aswell as internal connections in the VPN network itself
iptables -A FORWARD -i $i -o eth0 -m conntrack --ctstate ESTABLISHED,RELATED -j ACCEPT
iptables -A FORWARD -i eth0 -o $i -m conntrack --ctstate ESTABLISHED,RELATED -j ACCEPT
iptables -A FORWARD -i $i -o $i -j ACCEPT

# VPS to LAN - only allow DNS and ICMP (example)
iptables -A FORWARD -s 10.1.1.0/25 -d 192.168.30.0/24 -p icmp -j ACCEPT
iptables -A FORWARD -s 10.1.1.0/25 -d 192.168.30.2 -p udp --dport 53 -j ACCEPT
iptables -A FORWARD -s 10.1.1.0/25 -j DROP

# Mobile devices - allow all traffic (example)
iptables -A FORWARD -s 10.1.1.128/25 -j ACCEPT

# Drop all rule for blocking unwanted traffic from the VPN to the LAN
iptables -A FORWARD -i $i -j DROP

# Allow all to the VPN devices from the LAN
iptables -A FORWARD -i eth0 -o $i -j ACCEPT
Obviously, this is a rather basic filtering configuration. But this may allow at least a first layer of cloisonning.
Feel free to add new rules or to modify this basis for your own architecture. You can use the wg-quick down wg0 and the iptables -F commands to wipe the VPN interface and the rules before re-executing the bash script.
To add clients to your VPN, install WireGuard, generate your private and public key for each client and configure it as follow (/etc/wireguard/wg0.conf remember?):
[interface]
PrivateKey= # The private key you generated for this client
Address = 10.1.1.2/32 # Here a VPS but 10.1.1.129 will correspond to a mobile client in the architecture described above
DNS = 192.168.30.2 # If you want your client to resolve lan domain names of your own DNS. You can also use public DNS such as OpenDNS or GoogleDNS

[peer]
PublicKey = # The public key of your server
Endpoint = your_public_ip:51820 # You may need to setup a port forwarding on your router
AllowedIps = 10.1.1.0/24,192.168.30.0/24 # The IPs which will be routed through the VPN interface. You can specify 0.0.0.0/0 to route all traffic through the VPN. If you want to connect to the host from a particular network, you must add it even if you don't plan to connect to it from the server. Otherwise, the host won't be able to connect back to the connecting client.
You have also to add the client to the server configuration by adding a peer entry:
[peer]
PublicKey = # The public key of the client
AllowedIps = 10.1.1.2/32 # The IP address of the client
Just restart WireGuard on both hosts by using wg-quick wg0 down then wg-quick wg0 up and you should be good to go!
Unfortunately, at the time of writing, WireGuard does not natively support dynamic IPs in the VPN. This is planned to be implemented in future versions. So you will have to configure static addressing for each peer. That would be a pain for an enterprise host-to-LAN but for me it is good enough.
Note that there is also no NAT involved in this configuration. You will need to add a static route to your router to be able to route traffic from your LAN to the VPN. Here is an example with UniFi:

Conclusion
WireGuard is lightning fast. I already used it to transfert huge files and an Alpine Linux VM with 1vCPU and 512MB of RAM is already overkill to achieve Gbs speeds. It also supports video streaming with no visible effect.
Moreover, it can recover nearly instantaneously from a network failure. The peers will reconnect as soon as their link is re-established. Routes are preserved and ensure no packet is sent over an interface not belonging to the VPN.
I used the following sources to make this guide: